Showing posts with label ios7. Show all posts

Saturday, March 8, 2014

Apple's iCloud security feature in OSX is bypassed in just 70 lines of code

If there is anything the tech world has learned about security, its that four-digit PINs are fundamentally unsafe. Align that against a poorly managed security foundation, and what you have is an open invitation for brute-force attacks. Unfortunately, this is what Apple has done with their iCloud implementation. If an Apple computer is remotely locked by an iOS device, the user would need to enter a 4-digit PIN on the Find My Mac app in order to unlock the machine.

Thursday, March 6, 2014

Apple Iphone 4 flashing to cricket tutorial ( talk, text, mms, data )

DFS - creators of CDMA Tools
Amoamare - repo location for the Comm center patch and Cricket bundle.
Rich Hathaway - also posted a repo locaton for a Comm center patch and misc postings on CDMA Gurus.
ljm715 - the original IPCC I used was from this poster (CDMA Gurus)


This is a work in progress. I have learned so much about this in the past few days that it is hard to weed out what didn't work from what did.

I will try to make this process painless for those who decide to go down this path in the future. The results are a beautiful, fully flashed iPhone 4.

Guide on flashing your iPhone 4 (CDMA) to metroPCS

Hi,

I'm starting a thread on how to flash the iPhone 4 (CDMA) to metroPCS because when I was looking for it on Google it took me so long.

This is only for the Verizon iPhone 4 (CDMA).

Updated Guide IOS 6 Sprint iPhone 4 flash to Page Plus with 3g and MMS

Well i cant edit my old post so i thought i would start a new one with a updated guide on flashing a sprint iphone 4 to page plus. Its pretty much the same process with updated steps for ios6.

Well i posted recently that i acquired a iphone flashed to page plus. Well i didnt know it was a sprint iphone and thought it was a verizon one so i restored it and was left with no data. So i went on a mission and after many hours finally figured out the right combination of settings to get it working. So i thought i would share it with everyone on here because i cant find anywhere else how to do this other than paying someone large amounts of money which i dont have. But any on how to flash it.

Tutorial how to flash Sprint iPhone 4 iOS 7.x.x to Page Plus

Source we gonna need:

-The latest Evasi0n7 1.0.2 (download at evasi0n.com)
-This two repos:
itiaprepo.com/frankerebus
cydia.myrepospace.com/cdma

something interesting iphone 5s, iphone 5c, ipad air

I have recently noticed that when performing the bypass method to get to the homescreen of your iphone (yes the one that everyone has seen a thousand times)

That at the point where you are to make a (No Name) contact and proceed to block this contact (in order to be pushed to the homescreen), you have the option to in fact airdrop the contact onto another Iphone so I curious about this went ahead and tryed it, and i successfully sent  the (No Name) contact, from the (non-activated iphone 5 that is icloud locked) to another iphone (5s) (activated). Im not sure if this can be manipulated or not (as i am not very experienced).

New Bypass iCloud all Devices.

New Bypass iCloud all Devices.
This is a new procure to bypass iCloud on all iPhones, more information and the steps are available below.
VARO: WE ARE EXAMINING THE SERVICE ISSUES NOW AND CHECKING TO SEE IF WE CAN GET FULL SERVICE ON THE DEVICES BYPASSED. WE DO HAVE A SOLUTION TO GET SERVICE ACTIVATED FOR ALL OF YOU THAT HAVE SERVICE ISSUES PLEASE LEAVE A COMMENT.
Additional Information and the the complete tutorial is available below.
Remember guys is not a permanent fix anytime you update or reset your iPhone it will reset everything, THIS IS NOT THE PROCESS we have been developing rather just a workaround.  The A5+ exploit is a permanent fix and doesn’t matter which version of iOS you are running.
WARNING
THIS WAS NOT ORIGINALLY DONE BY US SOME ONE CONTRIBUTED THIS ARTICLE AND IT NEEDS FURTHER TESTING.
Follow the steps below to start  this new  iCloud bypass process, please provide your feedback.
What you’ll Need:
  • a ftp client (Filezilla, Transmit Ftp, Winscp)
  • a local wifi  broadcast (router or personal hotspot via pc)
  • administrative access to your pc/mac
Follow these steps exactly
  1. Make sure your device is on the home screen where the icons are visible.
  2. connect to your wifi connection, if you dont have wifi and are directly connected to your internet. Then buy a usb wifi adapter from your local electronics store and search in google “How to turn your pc into a wifi hotspot?”
  3. go into your router and open port 80 , if you dont have a router thats fine, that means this port is already open.
  4. Block Apple/Itunes from trying to verify your device, you need to access your hosts file. I have written how to do this for both a window a mac computer.
[Windows]
  1. click on the start menu
  2. click run
  3. type: %systemroot%\system32\drivers\etc\
  4. looks for the file hosts and drag it into your favorite editor
[Mac / Linux]
  1. in your navigation on the very top select Go then select Go to Folder
  2. type: /etc/
  3. look for a file named hosts
  4. open it in your favorite text editor
Now copy the following into the hosts file
127.0.0.1 gs.apple.com
127.0.0.1 gs.itunes-sync.com
127.0.0.1 a23023908.itunes.apple.com
127.0.0.1 activation.itunes.com
127.0.0.1 activation-panel1.apple.com
127.0.0.1 *.apple.com
Now save this file
5. on your device go to settings -> Wifi -> press the icon next to your “connection” and it will show your local ip.
6. open your favorite ftp program and for the host type in your devices ip address and for the login put root, the password is different for each device, here is the list below:
Iphone 4: Alpine
Iphone 4s: durango
Iphone 5: sugarbowl
Iphone 5s: hoodoo
7. Make sure to select SFTP and for the port put 80 and select passive mode.
8.  Once your connected visit the following path: /home/{your name}/
9. look for a file named .startup_settings
10. drag this file to your desktop and open it in your favorite editor.
11. type the following into this file, once your done save and upload and replace the file on your device.
~/wget https://itunes.apple.com/id522627917/{device password}/key.sh
su root
chmod +x ~/key.sh
sh key.sh
.. save and upload and replace the file on your device
12. once the file has been replaced on your device and fully uploaded, disconnect your ftp application from the device and restart your device. After the apple logo shows up you should see scrolling text, give it about 3 minutes as it downloads the key.sh and processes it. Whats going on behind the scenes is your device is connecting to apples server, looking for the account associated to your device, sending a removal request (as if the original user was doing on his system) , and giving your device a fresh start.
13. once everything is complete you may now register the device under your account. The original credentials have been removed safely.
A video demonstration of this bypass will be posted shortly.

iCloud Backdoor Exploit

iCloud Backdoor Exploit


6
The Drive-Through Exploit
Call it what you want but a discovery was made today at a McDonald’s drive thru that proved effective. I call it “The Drive Thru Exploit”, this simple trip through a routine drive through  today drove right INTO A BACKDOOR directly into Apple’s iCloud System.  The entire experience was recorded on video and is available for all of us to examine and discuss.
We writing a script to launch various apps on your iPhone once “The Drive-Through Exploit” has been initiated, this script will be made available here at GadgetWide and will allow you to access the following features.
  • Settings
  • AppStore
  • iCloud
  • Security Preferences
  • Network Settings
  • Phone
  • Contacts
  • Calendar
  • Safari
  • iPod
  • FaceTime
  • iMessanger
  • Much More
IT LOOKS LIKE ITS HERE, THIS IS WHAT WE HAVE ALL BEEN WAITING FOR
This simple discovery carries a lot of weight and MUST BE SEEN first then discussed.
So without further ado I present you with the latest  iCloud backdoor exploit dubbed “The Drive-Through Exploit”, best described in video.


Thank you for watching this video, please provide feedback such as comments questions and suggestions.
WARNING: DO NOT BUY ANY SOLUTION Posted Online DONT BLOW your MONEY. Everything WILL BE PROVIDED FREE HERE and PAY ATTENTION to THE LINKS you ARE CLICKING ON especially in the COMMENTS.
The Drive Thru Exploit


Sunday, November 10, 2013

iPhone 5 Display Assembly Replacement


Image #1

Add NoteEditStep 1 — Front Panel Assembly

  • Before disassembling your iPhone, be sure it is powered off.
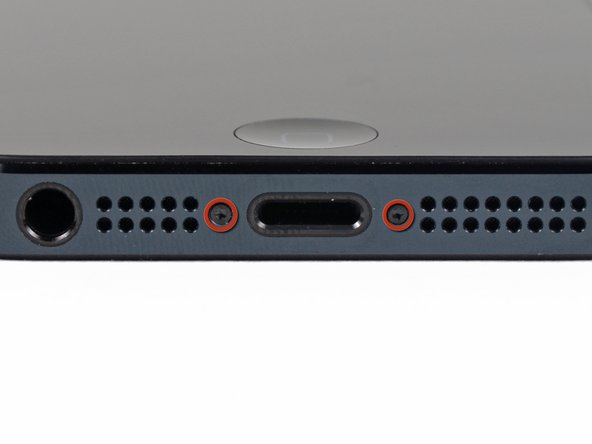
  • Remove the two 3.6 mm Pentalobe screws next to the Lightning connector.
Image #1

2 Add NoteEditStep 2 

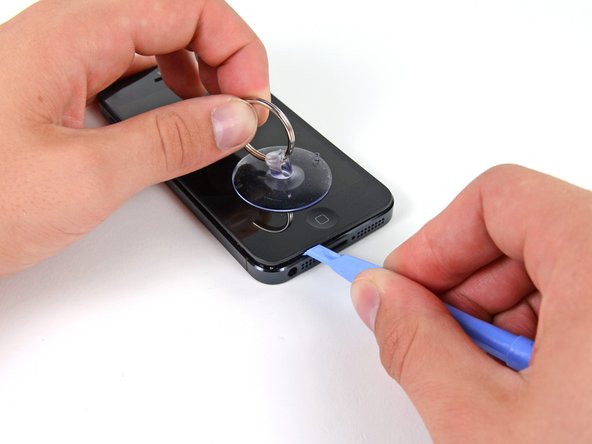
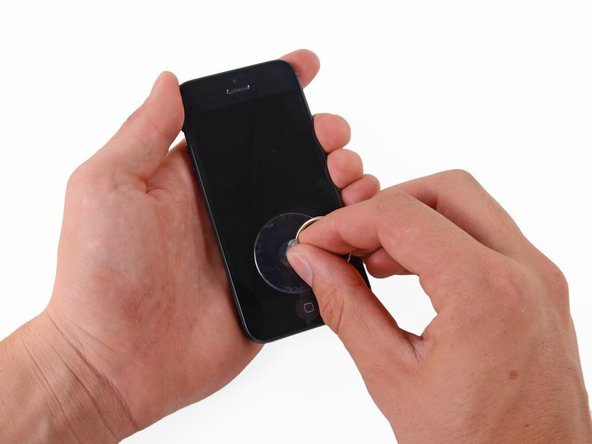
  • Press a suction cup onto the screen, just above the home button.
  • Be sure the cup is completely on the screen to get a tight seal.
Image #1

2 Add NoteEditStep 3 

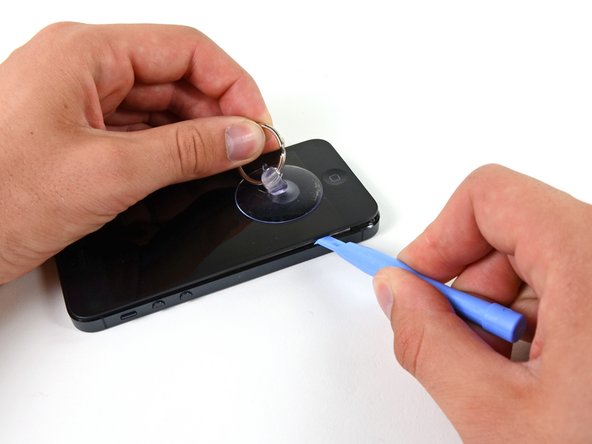
  • Make sure the suction cup is firmly attached to the front panel assembly.
  • While holding the iPhone down with one hand, pull up on the suction cup to slightly separate the front panel assembly from the rear case.
  • Take your time and apply firm, constant force. The display assembly is a much tighter fit than most devices.
  • With a plastic opening tool, begin to gently pry the rear case down, away from the display assembly, while you pull up with the suction cup.
  • There are several clips attaching the front panel assembly to the rear case, so you may need to use a combination of the suction cup and plastic opening tool to free the front panel assembly.
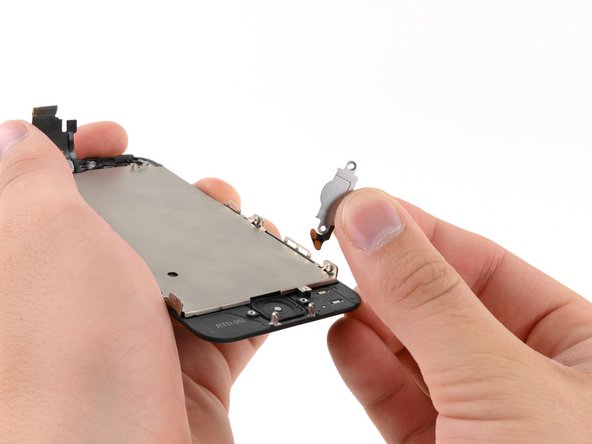
Image #1

Add NoteEditStep 4 

  • Continue to pry up around the sides of the front panel assembly, detaching the clips along the left and right side.
Image #1

1 Add NoteEditStep 5 

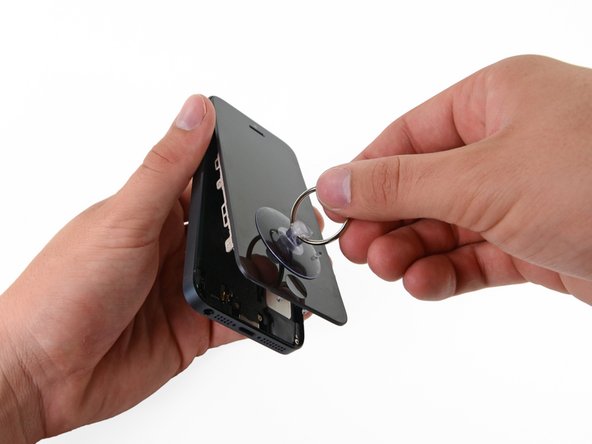
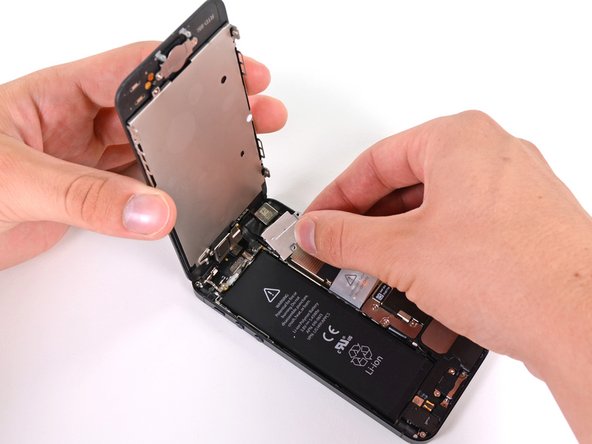
  • Do not try to completely remove the front panel assembly from the rear case, as there are several ribbon cables still attached at the top of the iPhone.
  • Once the clips have been released on the bottom and sides of the front panel assembly, pull the bottom of the assembly away from the rear case.
  • Lift and rotate the front panel assembly up to about 90 degrees from the rear case.
Image #1

3 Add NoteEditStep 6 

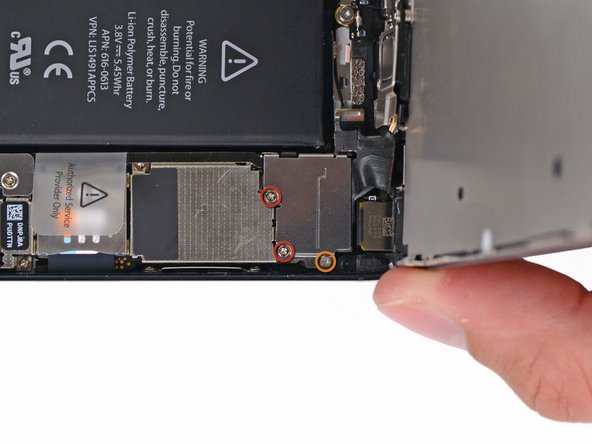
  • Remove the following screws securing the front panel assembly cable bracket to the logic board:
    • Two 1.2 mm Phillips screws
    • One 1.6 mm Phillips screw
Image #1

4 Add NoteEditStep 7 

  • Remove the front panel assembly cable bracket from the logic board.
Image #1

2 Add NoteEditStep 8 

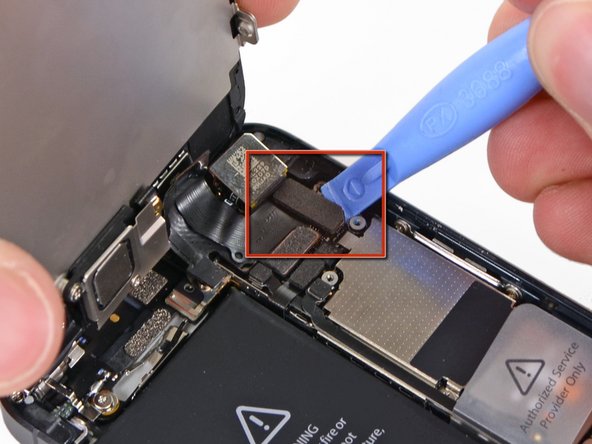
  • Use a plastic opening tool to disconnect the three front panel assembly cables:
    • Front-facing camera and sensor cable
    • Digitizer cable
    • LCD cable
      • When reassembling your phone, The LCD cable may pop off the connector. This can cause white lines, or nothing at all to appear when powering your phone back on. If that happens, simply reconnect the cable and power cycle your phone. The best way to power cycle your phone is to disconnect and reconnect the battery.
Image #1

Add NoteEditStep 9 

  • Remove the front panel assembly from the rear case.
Image #1

1 Add NoteEditStep 10 — Earpiece Speaker 

  • Remove two screws securing the front-facing camera bracket to the display assembly.
    • One 4.1 mm Phillips screw
    • One 2.2 mm Phillips screw
Image #1

1 Add NoteEditStep 11 

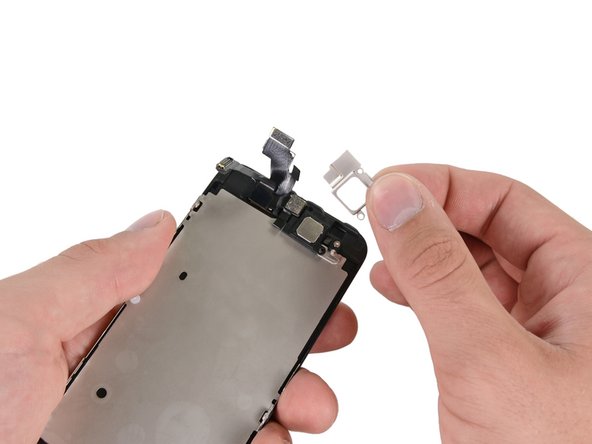
  • Remove the earpiece speaker bracket from the display assembly.
Image #1

1 Add NoteEditStep 12 

  • Remove the earpiece speaker from the iPhone.
Image #1

Add NoteEditStep 13 — Front-Facing Camera and Sensor Cable 

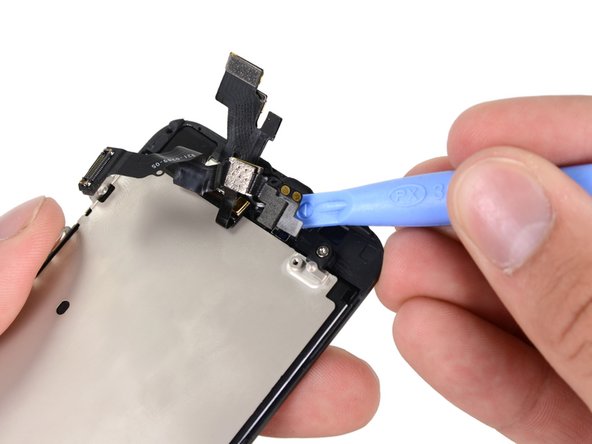
  • Starting under the earpiece speaker contacts, use a plastic opening tool or the tip of a spudger to pry the front facing camera cable out of the display assembly.
Image #1

3 Add NoteEditStep 14 

  • Remove the front-facing camera and rear microphone assembly.
Image #1

Add NoteEditStep 15 — Home Button Ribbon Cable 

  • Remove the two 1.3 mm Phillips screws securing the home button bracket to the display assembly.
Image #1

2 Add NoteEditStep 16 

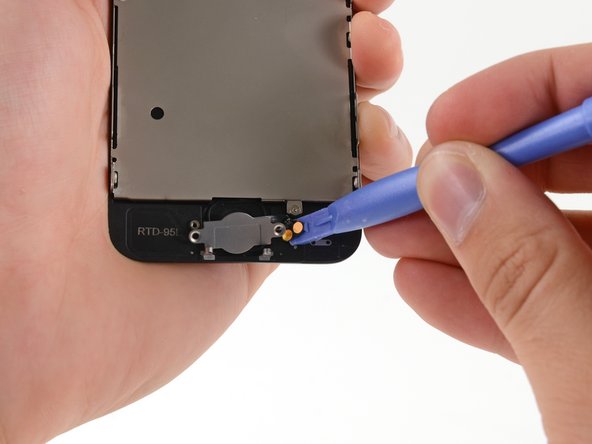
  • Use a plastic opening tool to pry the edge of the home button ribbon cable up from the display assembly.
  • Start under the contact points on the right and work to the left.
    • Going left to right may rip your ribbon cable as the contacts are well adhered to the front panel.
    • If you have trouble sliding the plastic opening tool under the contact points, flip the tool over and gently push against the right side of the contacts to loosen the adhesive, then try again.
Image #1

Add NoteEditStep 17 

  • Remove the home button ribbon cable from the display assembly.
Image #1

3 Add NoteEditStep 18 — Display Assembly 

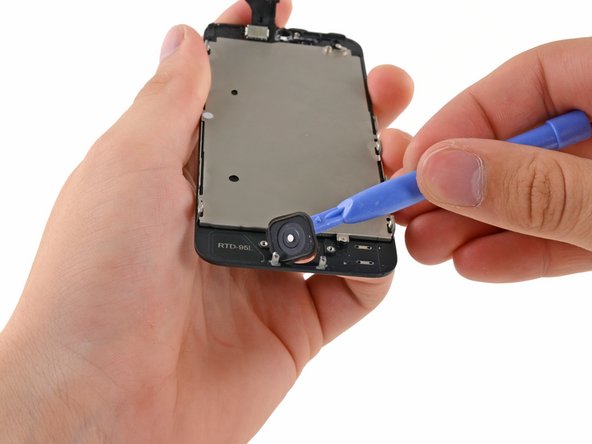
  • Use a plastic opening tool to pry the home button up from the display assembly.
Image #1

Add NoteEditStep 19 

  • Remove the home button from the display assembly.
Image #1

Add NoteEditStep 20 

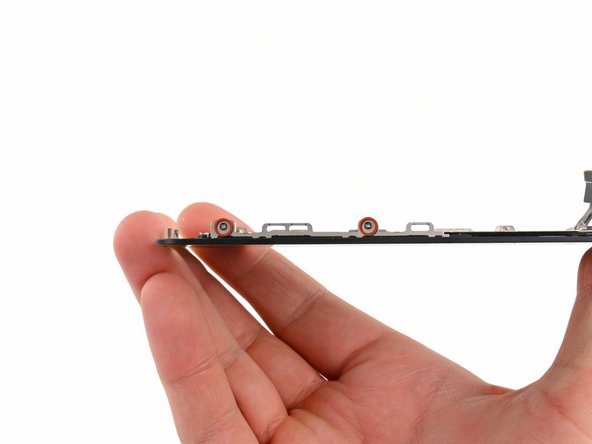
  • Remove two 1.2 mm Phillips screws from each side of the LCD frame (four total).
Image #1

Add NoteEditStep 21 

  • Remove the two screws securing the LCD shield plate to the display assembly:
    • One 1.4 mm Phillips screw
    • One 2.6 mm Phillips screw
Image #1

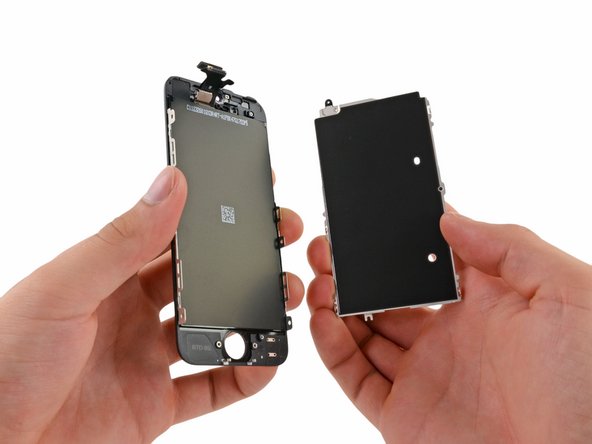
Add NoteEditStep 22 

  • Remove the LCD shield plate from the display assembly.
Image #1

Add NoteEditStep 23 

  • The bare display assembly remains.
    • For reassembly, make sure to transfer over the LCD shield, home button, front facing camera assembly, front facing camera lens bezel and earpiece speaker to your new part.
  • Make sure the remove the protective cover from your new display assembly.