Showing posts with label cdma. Show all posts
Tuesday, March 18, 2014
How to Flash Sprint Samsung Galaxy s5 to Pagplus
4:03 AM
Android
,
cdma
,
flashing
,
galaxy s5
,
guides
,
samsung
,
samsung galaxy s5
,
sprint
,
verizon
8
comments
Saturday, March 15, 2014
How to flash Sprint iPhone 4 4s to PagePlus iOS 7.0.4
3:58 PM
apple
,
apple flashing
,
cdma
,
iphone 4
,
iphone 4s
,
Tutorials
,
unlock
,
xbmc
11
comments
Friday, March 14, 2014
Every file you need to become a Cellphone Flasher to any company
I have been loading guides on how to flash phones but just realized i never gave you the tools to do the job well here you are this kit contains the following
Software:
CDMA workshop
Sunday, March 9, 2014
Every file you need to become a Cellphone Flasher to any company
7:09 AM
cdma
,
cdmaware
,
flashing tools
,
free flashing tools
,
GSM
,
jailbreak
,
metropcs
,
pageplus
,
smartphone
,
unclocking
2
comments
Hey everyone
I have been loading guides on how to flash phones but just realized i never gave you the tools to do the job well here you are this kit contains the following
Saturday, March 8, 2014
Every file you need to become a Cellphone Flasher to any company
3:37 PM
cdma
,
cdma workshop
,
dfs
,
esn repair
,
flashing
,
how to guid
,
htc
,
jailbreak
,
metro
,
motorolla
,
samsung
,
smartphone
,
unlocking
No comments
Hey everyone
I have been loading guides on how to flash phones but just realized i never gave you the tools to do the job well here you are this kit contains the following
Software:
CDMA workshop
I have been loading guides on how to flash phones but just realized i never gave you the tools to do the job well here you are this kit contains the following
Software:
CDMA workshop
Thursday, March 6, 2014
Flash Sprint Galaxy S3 to Page Plus the Easy Way
8:20 PM
cdma
,
cdma flashing
,
metropcs
,
pageplus
,
ppc
,
samsung 16 digit password
,
samsung galaxy s3
,
samsung note 2
,
Tutorials
No comments
Ok, so you have a Sprint Samsung Galaxy S3, [SPH-L710] and you want to Flash it to Page Plus?
[I'm assuming this will work for ANY carrier, but we all know what assuming does...]
[I'm assuming this will work for ANY carrier, but we all know what assuming does...]
Android 4.4 Upgrade Methods for Verizon and Sprint Phones
DO NOT DOWNLOAD THESE FILES AND ATTEMPT UNLESS YOU ARE 100% SURE YOU KNOW WHAT YOU ARE DOING
THIS WILL LOCK YOUR BOOTLOADER FOREVER NO GOING BACK TO PREVIOUS VERSIONS EVER
Let me stress that anytime you flash either with ODIN or normal methods you take the chance of BRICKING your device.
SO be sure you know what you are doing as I am not responsible for anything that may go wrong.....
These will wipe your devices and bring the phone back to like is what was brand new, and should not affect your flash, but then again do at your own risk.....
__________________________________________________ __________________________________________________ __________________
ODIN 3.07 Program to use for the Update: https://www.dropbox.com/s/zjw7zhr9br...Odin_v3.07.rar
Flashing Firmware with Odin Instructions:
1. Put your phone into download mode. To do this turn the phone off and then press volume down+home button+power button at the same time. You will then get a warning saying press up to continue and down to cancel, press volume up and you are now in download mode
2. Start Odin
3.At this point please make sure that ONLY TWO OPTIONS TICKED are "Auto Reboot" and "F.Reset Time" (otherwise you could end up with a very expensive paperweight)
4. Select the PDA button in the Odin program: Direst it to the tar file that you are using to upgrade the one you downloaded for your device......
5. Plug your Phone into the computer, wait for the drivers to install and then wait for the ID:COM section to turn blue in ODIN.
7.Press start and the flash will begin, once this has started do not remove the usb cable or turn off your computer or the device (or you will have brick for sure) the phone will reboot once the flash has finished.
8. All Done Enjoy 4.3
Apple Iphone 4 flashing to cricket tutorial ( talk, text, mms, data )
8:04 PM
apple
,
apple flashing
,
applehowto
,
cdma
,
flashing
,
Icloud ios bypass
,
Ios icloud bypass
,
ios7
,
ipad
,
iphone
,
iphone 4
,
iphone 5
,
Page plus
,
pageplus
,
ppc
,
Tutorials
,
unlock
,
xbmc
No comments
DFS - creators of CDMA Tools
Amoamare - repo location for the Comm center patch and Cricket bundle.
Rich Hathaway - also posted a repo locaton for a Comm center patch and misc postings on CDMA Gurus.
ljm715 - the original IPCC I used was from this poster (CDMA Gurus)
This is a work in progress. I have learned so much about this in the past few days that it is hard to weed out what didn't work from what did.
I will try to make this process painless for those who decide to go down this path in the future. The results are a beautiful, fully flashed iPhone 4.
Guide on flashing your iPhone 4 (CDMA) to metroPCS
8:01 PM
apple
,
apple flashing
,
applehowto
,
cdma
,
flashing
,
ios7
,
ipad
,
iphone
,
iphone 4
,
iphone 5
,
metropcs
,
Page plus
,
pageplus
,
ppc
,
Tutorials
,
unlock
,
xbmc
No comments
Hi,
I'm starting a thread on how to flash the iPhone 4 (CDMA) to metroPCS because when I was looking for it on Google it took me so long.
This is only for the Verizon iPhone 4 (CDMA).
I'm starting a thread on how to flash the iPhone 4 (CDMA) to metroPCS because when I was looking for it on Google it took me so long.
This is only for the Verizon iPhone 4 (CDMA).
Verizon Iphone 5 7.0.4 flashing to page plus Successfully done with 3G.
7:50 PM
apple
,
apple flashing
,
applehowto
,
cdma
,
flashing
,
guide
,
ipad air
,
iphone 4
,
iphone 5c
,
iphone 5s
,
metropcs
,
Page plus
,
pageplus
,
ppc
,
sprint
,
Tutorials
,
unlock
,
xbmc
No comments
What you need:
Iphone 5 verizon version running 7.0.4
ifile and tetherme
Evad3rs jailbreak.
page plus prl file.
verizon sim card without service
Iphone 5 verizon version running 7.0.4
ifile and tetherme
Evad3rs jailbreak.
page plus prl file.
verizon sim card without service
Sunday, November 10, 2013
iPhone 5 Display Assembly Replacement
EditStep 1 — Front Panel Assembly
- Before disassembling your iPhone, be sure it is powered off.
- Remove the two 3.6 mm Pentalobe screws next to the Lightning connector.
2
EditStep 2
- Press a suction cup onto the screen, just above the home button.
- Be sure the cup is completely on the screen to get a tight seal.
2
EditStep 3
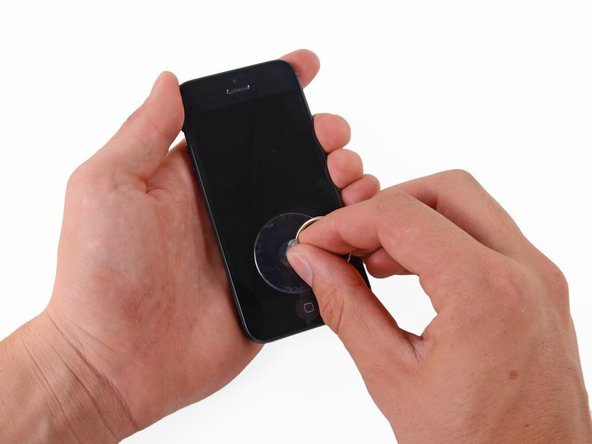
- Make sure the suction cup is firmly attached to the front panel assembly.
- While holding the iPhone down with one hand, pull up on the suction cup to slightly separate the front panel assembly from the rear case.
- Take your time and apply firm, constant force. The display assembly is a much tighter fit than most devices.
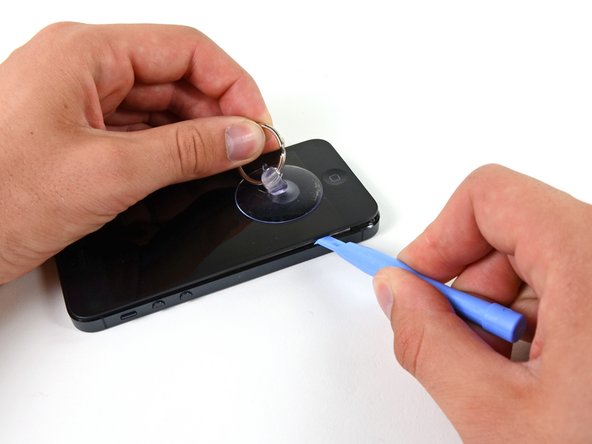
- With a plastic opening tool, begin to gently pry the rear case down, away from the display assembly, while you pull up with the suction cup.
- There are several clips attaching the front panel assembly to the rear case, so you may need to use a combination of the suction cup and plastic opening tool to free the front panel assembly.
EditStep 4
- Continue to pry up around the sides of the front panel assembly, detaching the clips along the left and right side.
1
EditStep 5
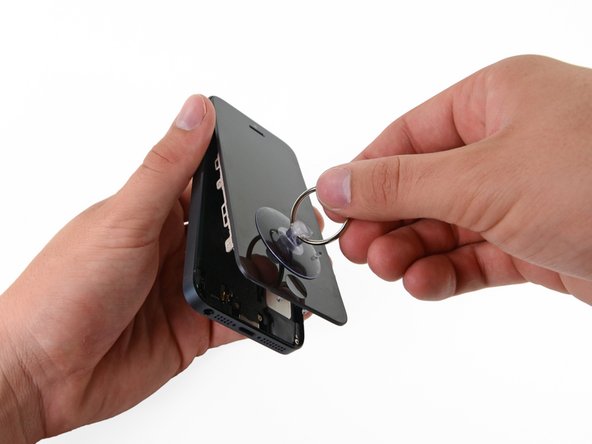
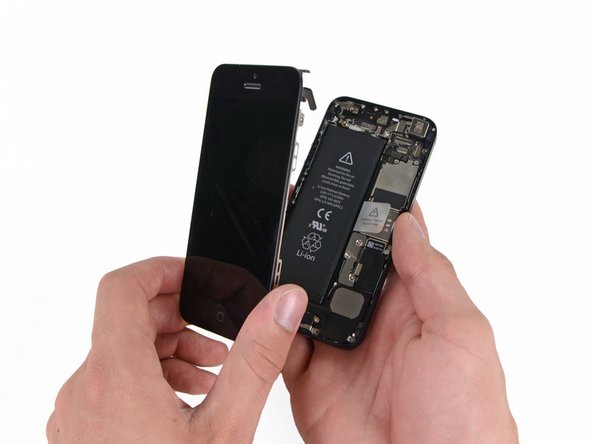
- Do not try to completely remove the front panel assembly from the rear case, as there are several ribbon cables still attached at the top of the iPhone.
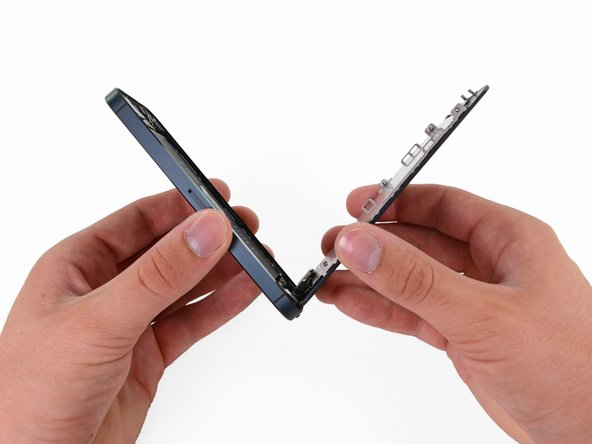
- Once the clips have been released on the bottom and sides of the front panel assembly, pull the bottom of the assembly away from the rear case.
- Lift and rotate the front panel assembly up to about 90 degrees from the rear case.
3
EditStep 6
- Remove the following screws securing the front panel assembly cable bracket to the logic board:
- Two 1.2 mm Phillips screws
- One 1.6 mm Phillips screw
2
EditStep 8
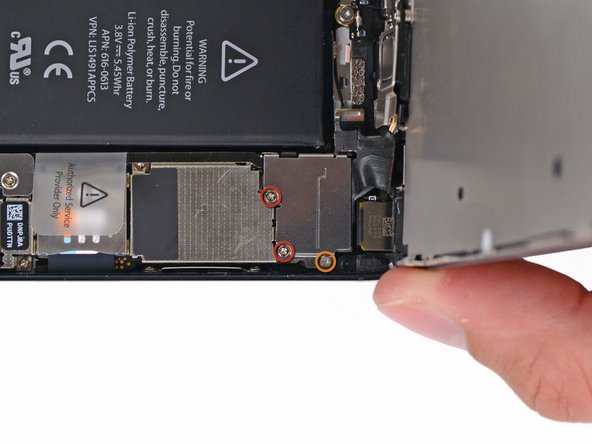
- Use a plastic opening tool to disconnect the three front panel assembly cables:
- Front-facing camera and sensor cable
- Digitizer cable
- LCD cable
- When reassembling your phone, The LCD cable may pop off the connector. This can cause white lines, or nothing at all to appear when powering your phone back on. If that happens, simply reconnect the cable and power cycle your phone. The best way to power cycle your phone is to disconnect and reconnect the battery.
1
EditStep 10 — Earpiece Speaker
- Remove two screws securing the front-facing camera bracket to the display assembly.
- One 4.1 mm Phillips screw
- One 2.2 mm Phillips screw
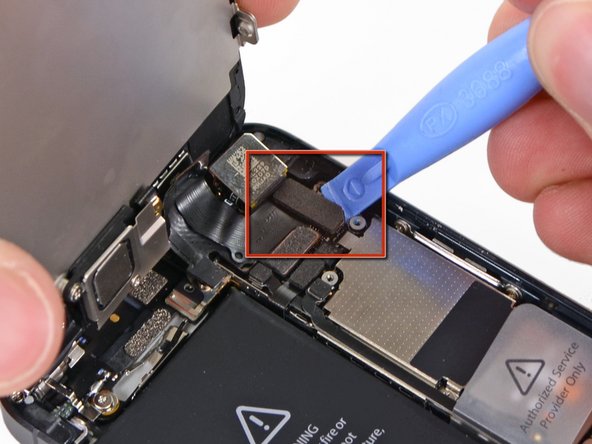
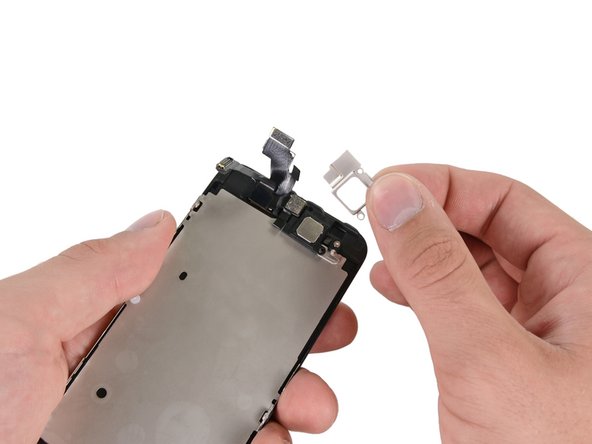
EditStep 13 — Front-Facing Camera and Sensor Cable
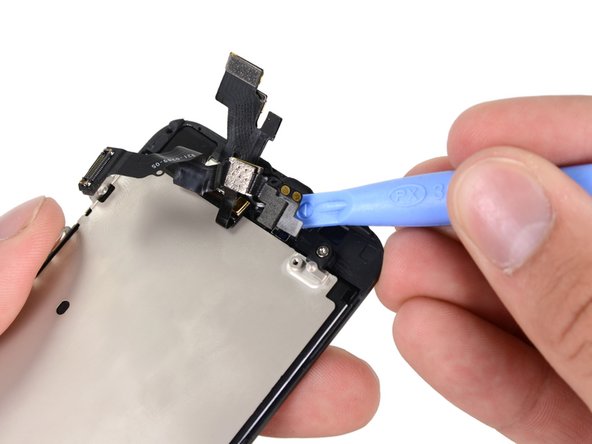
- Starting under the earpiece speaker contacts, use a plastic opening tool or the tip of a spudger to pry the front facing camera cable out of the display assembly.
EditStep 15 — Home Button Ribbon Cable
- Remove the two 1.3 mm Phillips screws securing the home button bracket to the display assembly.
2
EditStep 16
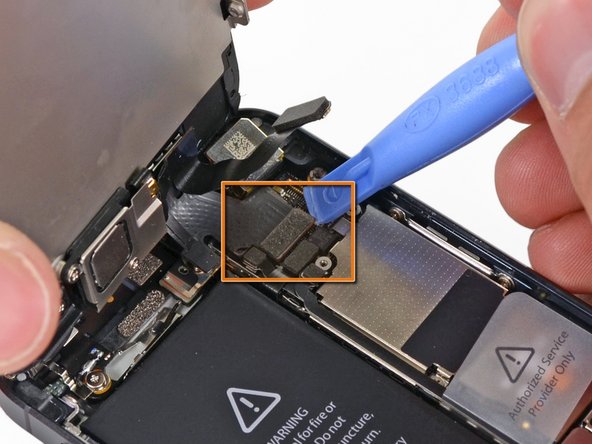
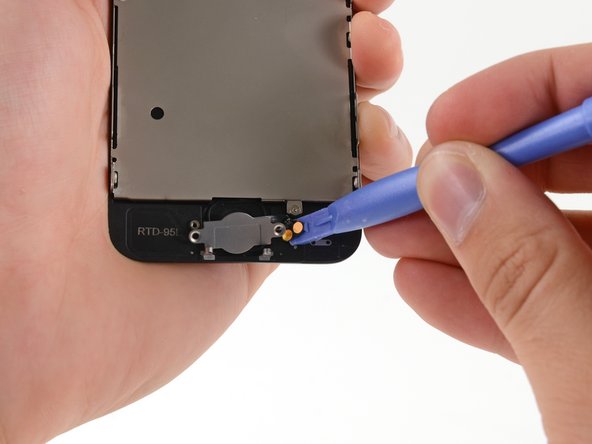
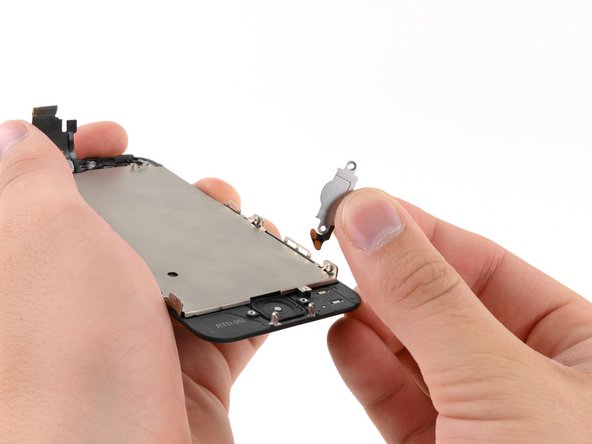
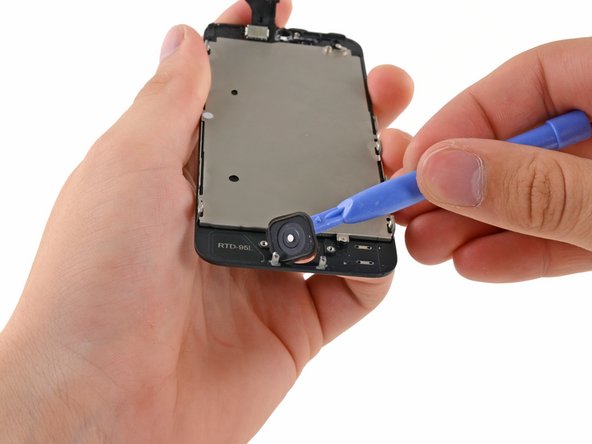
- Use a plastic opening tool to pry the edge of the home button ribbon cable up from the display assembly.
- Start under the contact points on the right and work to the left.
- Going left to right may rip your ribbon cable as the contacts are well adhered to the front panel.
- If you have trouble sliding the plastic opening tool under the contact points, flip the tool over and gently push against the right side of the contacts to loosen the adhesive, then try again.
3
EditStep 18 — Display Assembly
- Use a plastic opening tool to pry the home button up from the display assembly.
EditStep 21
- Remove the two screws securing the LCD shield plate to the display assembly:
- One 1.4 mm Phillips screw
- One 2.6 mm Phillips screw
EditStep 23
- The bare display assembly remains.
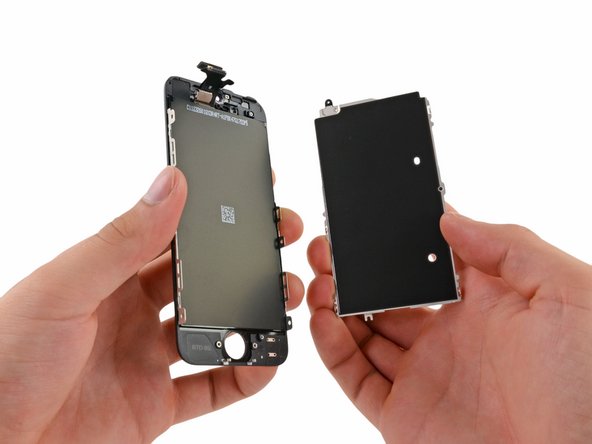
- For reassembly, make sure to transfer over the LCD shield, home button, front facing camera assembly, front facing camera lens bezel and earpiece speaker to your new part.
- Make sure the remove the protective cover from your new display assembly.
Subscribe to:
Posts
(
Atom
)